Mobile Waste Oil Drainer with Pneumatic Emptying, 70 L
-
Code:118757
-
Weight:22.000 Kgs
Overview:
✔ 70 L tank for collecting waste oil by gravity
✔ Compressed-air emptying at a discharge pressure of 0.5 bar
✔ Height-adjustable collection funnel and handle
✔ 400 mm collection funnel with strainer
✔ Tank level indicator for monitoring the collected volume
✔ Four ball-bearing wheels, including two swivel castors
✔ Additional tank connection for optional accessories


This mobile waste oil drainer collects up to 70 L of oil. The collection funnel is mounted on a height-adjustable telescopic tube and includes a strainer. A level indicator on the side of the tank allows the collected oil quantity to be monitored.
The tank is emptied using compressed air.
Oil collection and height adjustment
Both the handle and the telescopic tube for the collection funnel are height-adjustable.
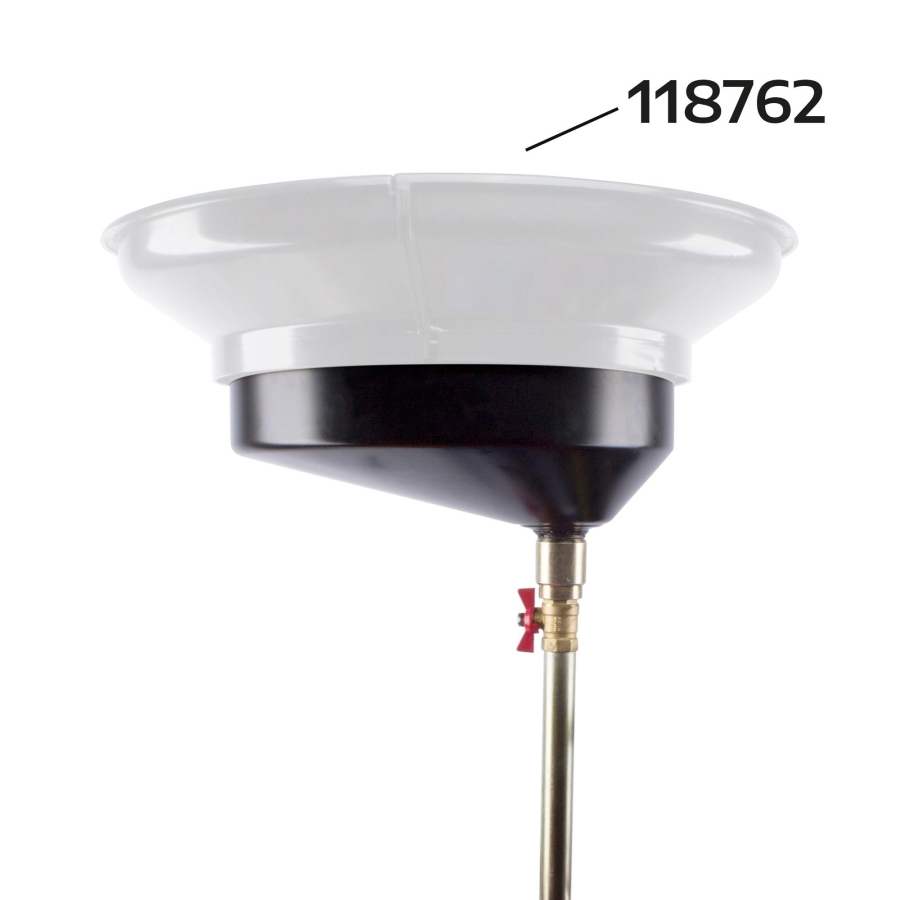
The round funnel has a diameter of 400 mm and can be expanded to 600 mm with the optional collection funnel, Item no. 118762. Fitting the extension also increases the collection height.
Tank monitoring and emptying
The side-mounted level indicator shows the oil quantity in the tank. Compressed-air emptying operates at a tank discharge pressure of 0.5 bar.
The unit includes a safety valve, shut-off valve and clamping screw for pressure emptying.
Optional accessories
The base unit can be equipped with a vacuum extraction unit, extraction probes, a larger collection funnel and an inspection chamber.
An additional connection with a blanking plug is provided on the tank for fitting accessories. Vacuum extraction requires the optional extraction equipment.
Mobility and storage
Four ball-bearing wheels, including two swivel castors, allow the unit to be moved around the workshop. A plastic tray provides storage for small parts.
Technical specifications
- Height adjustment: 1,400–1,600 mm
- Tank capacity: 70 L
- Collection funnel diameter: 400 mm
- Oil discharge pressure: 0.5 bar
- Specified compressed-air supply pressure: 6–8 bar
- Oil drain hose length: 1.5 m
- Dimensions: Approx. 500 × 500 × 1,350 mm (L × W × H)
- Maximum oil temperature: 80 °C
Assembly
Rubber seals may be treated with silicone, and threaded connections should be assembled using a suitable sealant.
- Insert the handle into its mounting bracket and tighten the screws.
- Fit the wheels onto the axle tubes and install the swivel castors from below into their brackets. Tighten the nuts.
- Insert the collection funnel’s telescopic tube into its opening and secure it with the clamping nut. Fit and secure the collection funnel onto the shut-off valve.
- Attach the plastic small-parts tray to its bracket.
- Fit the vacuum unit according to the manufacturer’s assembly diagram for the 70 L version.
- Attach the cylindrical probe holder to the side bracket.
- Check that all connections are secure and close all ball valves to prevent unintended leakage.
Adjusting the collection funnel
The telescopic tube allows the collection funnel to be adjusted in height and swivelled around.
The funnel can be expanded to a diameter of 600 mm using the optional collection funnel, Item no. 118762. The wider collection area helps catch oil when removing the oil filter and draining the engine at the same time.
The extraction probes connect directly to the extraction hose.
Collecting oil by gravity
- Position the unit beneath the expected oil outlet.
- Adjust the funnel height using the telescopic tube.
- Open the collection funnel’s ball valve to allow oil to drain into the main tank.
- Close the ball valve once draining is complete.
Extracting oil by vacuum
The vacuum generator uses the Venturi effect: compressed air flowing through the generator creates suction for extracting oil.
- Select the largest extraction probe suitable for the vehicle and connect it to the extraction hose.
- Close all valves, then open only the valve leading to the extraction probe hose.
- Connect the compressed-air supply to the vacuum generator and open its inlet valve.
- Adjust the vacuum using the shut-off valve.
- Monitor the tank level indicator during extraction.
Monitor the pressure/vacuum gauge throughout operation. The needle must never enter the red zone. The working air pressure for the vacuum system is 6–8 bar.
Emptying by gravity
- Close all shut-off valves.
- Place the discharge hose into a suitable waste oil container.
- Open the discharge valve and allow air into the tank through the small valve at the pressure-relief assembly.
- Oil flows out by gravity until the liquid levels equalise.
Emptying with compressed air
- Close all shut-off valves, including the collection funnel valve.
- Place the discharge hose into a suitable waste oil container.
- Hold or secure the curved discharge outlet. Escaping air can cause it to move, particularly towards the end of emptying.
- Connect the compressed-air supply to the pressure regulator used for tank emptying.
- Open the discharge hose valve and use the small valve at the pressure-relief assembly to pressurise the tank.
- The regulator supplies approximately 0.5 bar to the tank to discharge the oil.
The tank-emptying pressure is approximately 0.5 bar. The 6–8 bar working air pressure specified for vacuum generation must not be applied directly to the tank.
Permitted use and precautions
Read the operating instructions carefully before use and retain them for future reference. Regular inspection and maintenance are essential for reliable operation.
- The unit is approved only for extracting, collecting and disposing of oil. Pneumatic operation does not constitute approval for use with other flammable liquids.
- Do not collect or extract corrosive liquids.
- Position and operate the unit on a level surface.
- Do not exceed an oil temperature of 80 °C.
- Follow the applicable handling precautions for the oil being collected.
- Dispose of all collected liquids in accordance with applicable requirements.
- Do not mix liquids that require separate storage or disposal.
- Keep the unit and its components away from hot surfaces and flames, and protect them from adverse environmental conditions.
- Do not carry out unauthorised repairs to the pressure vessel or safety valves.
Checks before use
- Check that all connections are secure and leak-tight against both air and oil.
- Inspect the unit and its components for visible damage.
- Use the vacuum generated by the unit to check for leaks. If a leak is detected, contact the manufacturer.
- Keep the unit clean so that damage and leaks can be identified.
- Monitor the pressure/vacuum gauge throughout operation. The needle must never enter the red zone.
Regular maintenance and storage
- Inspect the unit and its connections regularly for air and oil leaks.
- Close the ball valves when the unit is not in use.
- Keep the collection funnel, hoses and extraction probes clean.
- Store the extraction probes in their holder.
- Have faults affecting the pressure vessel or safety valves assessed by the manufacturer or an authorised service provider.